S
electing a
p
latform
As with most Guiding activities these days, you have a few options for how to proceed. Which you go with will depend on internet access, your preference and the preferences of the girls and their families.
Option 1 - Solo camp: This option isn't ideal for sharing the sisterhood, but will work best if you're in a location with challenging access to the internet or where parents want girls to stay off the computer. You can prepare a package for girls, with or without supplies, with everything they will need for their camping weekend. Perhaps it will include instructions to open certain parts only at a given time or when a clue is solved. Depending on how close together your girls are, you might choose to mail this or drop it off.
Option 2 - Social Media Camp: This is a happy-medium option. Choose a platform like Facebook where you can create a group. Post short instructions or even videos with activities for the girls over the course of the weekend. Encourage them to share pictures of what they have been doing so they don't feel so alone.
Option 3 - Video Camp: This is the option that this site is most designed for. Here your schedule will have some elements (opening, closing and certain of the activities) occurring together over video with others where the girls can leave the computer and come back together later to show what they've been doing. If you go this route, make sure to remind families that if girls are getting zoomed-out, they can always take a longer break.
Regardless of the option you choose, remember that no girl has to participate in ALL of the activities.
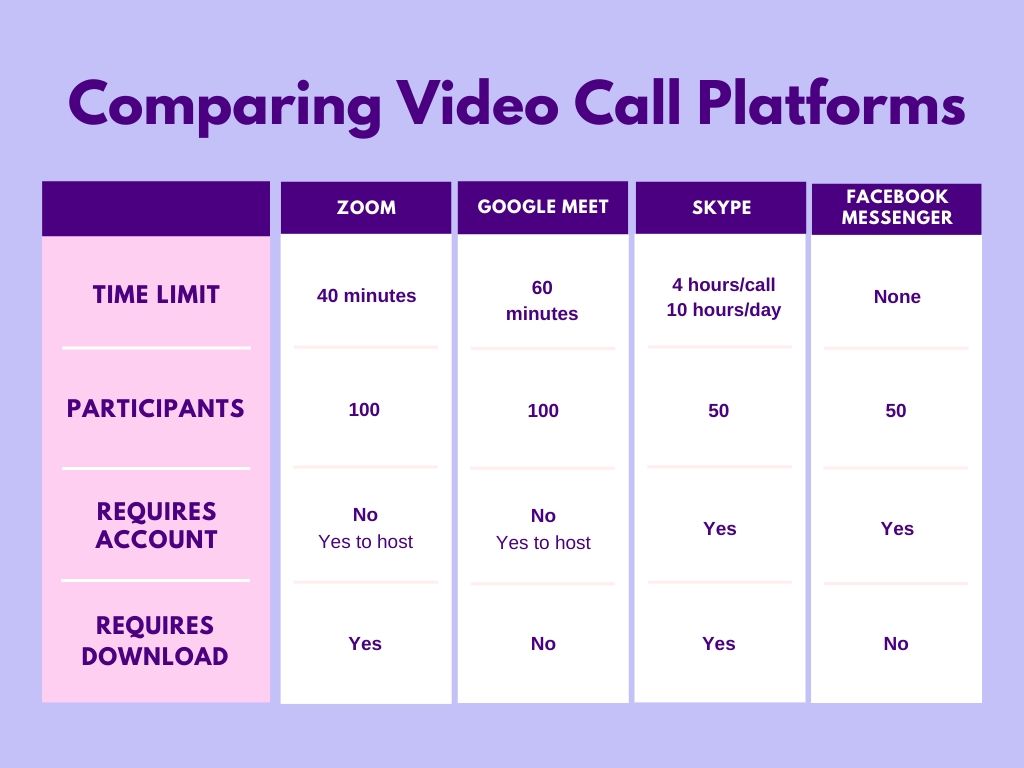
In the table below, I compare the free plans from some of the most popular platforms.

Other tools to consider
One of the benefits of an online camp is that you can use online tools that might be a challenge at your meetings if you don't have wifi or devices for everyone.
Girls First Platform: Since everyone is on a computer/phone/tablet anyways, now could be an interesting time to do some planning with girls using the Girls First platform. Alternatively, if you're using activities off the platform, you can share your screen and show some of the handouts that way so girls can see them and nobody has to print.
Visit somewhere new: Many museums, botanical gardens and zoos have installed webcams and/or have created ways to visit online. Check out one near you, or travel across the world!
Kahoot!: Kahoot! is a trivia game platform. You can create quizzes for the girls, have them create ones for each other or play ready-made ones on a variety of themes. Everyone will need 2 devices (one to play and one to see the shared screen) or to be able to split their screen in two with two browser pages displayed to see both at once.
Word Generator: This site will provide prompts in a variety of categories if you're playing Pictionary, charades or any other similar game.
Skribbl: Create a closed room and play a Pictionary-like game online.
Name, Place, Animal, Thing: Play a classic game where a letter of the alphabet is selected and players have to come up with a name, a place, an animal and a thing that begin with that letter. You can create a private room for your group.
Werewolf: You may have played werewolf in person, but now you can play online too. Create a private room and see whether you can save your village!
